Desktop Publishing (DTP) is required before every proposal is submitted to ensure the proposal is presented in a visually pleasing manner, the information is presented in an easy-to-understand format, and the proposal complies with the solicitation requirements.
Properly implemented, DTP requires advanced knowledge of page layout software (such as Microsoft Word or Adobe InDesign), as well as knowledge of the principles of graphic design and page layout design. However, any proposal professional can learn the basic principles and tools of desktop publishing that are necessary to make a visually appealing, compliant proposal.
This article will demonstrate the basic desktop publishing skills needed to make a reusable proposal template. The template will include all elements needed for a compliant proposal. We will also provide mini video tutorials for performing basic desktop publishing tasks.
The tutorials will provide demonstrations on using Microsoft Word because of its accessibility and popularity within the government proposal industry. A downloadable proposal template will be included at the end of the article.
We will cover the following topics:
- What is desktop publishing?
- Why is desktop publishing important for proposals?
- What software should be used for desktop publishing?
- What are the must-have desktop publishing skills for all proposal professionals?
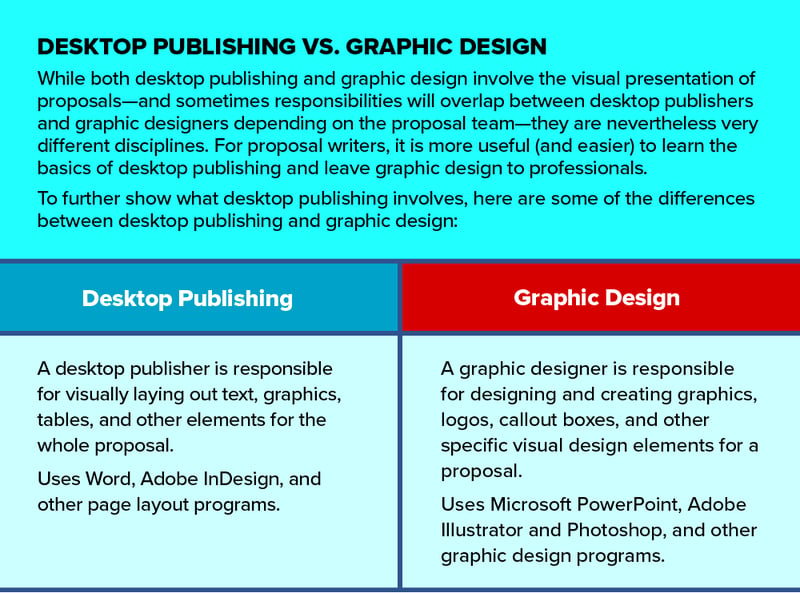
While desktop publishing—similar to writing, editing, and graphic design—should be performed by a dedicated desktop publisher that has specialized skills and expertise to do it properly, it is still useful for proposal professionals to know the basics of desktop publishing for the following reasons:
- Not all proposal teams have a full-time desktop publisher; having basic knowledge of desktop publishing allows you to be able to create a proposal template.
- Knowing desktop publishing skills makes it infinitely easier to create critical proposal elements such as tables of contents, numbered headings, headers, and footers, and elements that enhance the visual appeal of a proposal, like colorful tables, callout boxes/hotboxes, and simple graphics.
- Proposal professionals who use basic desktop publishing principles will avoid making formatting mistakes in a document, which can cause costly time delays for teams with or without a dedicated desktop publisher. Consequently, less time spent on desktop publishing means there is more time in the proposal life cycle for writing and reviews, which can improve the quality of a proposal.
- Writers who understand desktop publishing and Word’s advanced tools are able to work on a document more easily and produce a better proposal.
Therefore, it is beneficial for proposal writers and managers in proposal teams of all sizes to know the basics of desktop publishing.
What is desktop publishing?
Desktop publishing is the art of using specialized software to visually display information, either for physical print (such as books, magazines, pamphlets, etc.) or online distribution (electronic documents, web pages, etc.).
If you have ever adjusted the position of a graphic on a page, bolded a header to make it stand out more, or changed the color of a table to make it look nicer, then you have done a basic form of desktop publishing. In proposal development, desktop publishing is used to ensure proposal content is:
- Readable and accessible
- Communicating information effectively
- Visually appealing and incorporates the submitting company’s branding
- Compliant with solicitation requirements
Desktop publishing functions can also include formatting a print proposal for production, which may require different formatting from an entirely electronic proposal. For example, inside margins may have to be extended to allow for hole punches so a proposal can be bound in a binder. Also, some colors may have to be adjusted if they are not as visible in a print document as they are on a screen.
In the proposal development life cycle, desktop publishing occurs as an iterative process similar to editing. Desktop publishing should be used to establish a compliant proposal template before writing begins, and to clean up formatting before the red team review, before the gold team review, and before submission.
This schedule ensures the document is in its best state for reviewers for each review, and that any last-minute formatting mistakes are caught before submission. Desktop publishing usually must be conducted with all other contributors exited from a document (if using SharePoint or other collaborative platforms), as simultaneous changes can corrupt document formatting.
Because desktop publishing takes time, and proposal writing activities must cease as it is being conducted, it is imperative to minimize the time needed for desktop publishing. Having writers that know how to use a template properly can greatly reduce the time a desktop publisher needs to spend fixing a document’s formatting.
A well-formatted proposal leverages the formatting of text, graphics, tables, page layout, and other desktop publishing elements to emphasize important information and make it easy for the reviewer to read and understand. A desktop publisher must be able to use page layout software to generate tables of contents, figures, tables, headers and footers, cross-references, and other elements that are needed in a proposal.
Why is desktop publishing important for proposals?
Desktop publishing is vital to making a proposal compliant with solicitation requirements and presenting the proposal in a visually pleasing format that ensures the reviewer will easily understand and remember important information and desired takeaways. 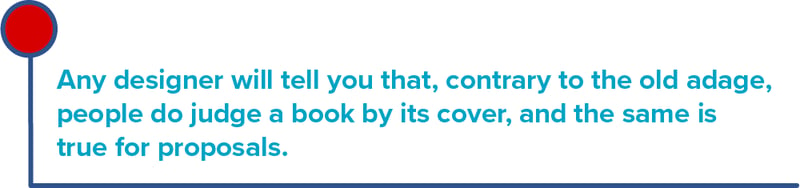
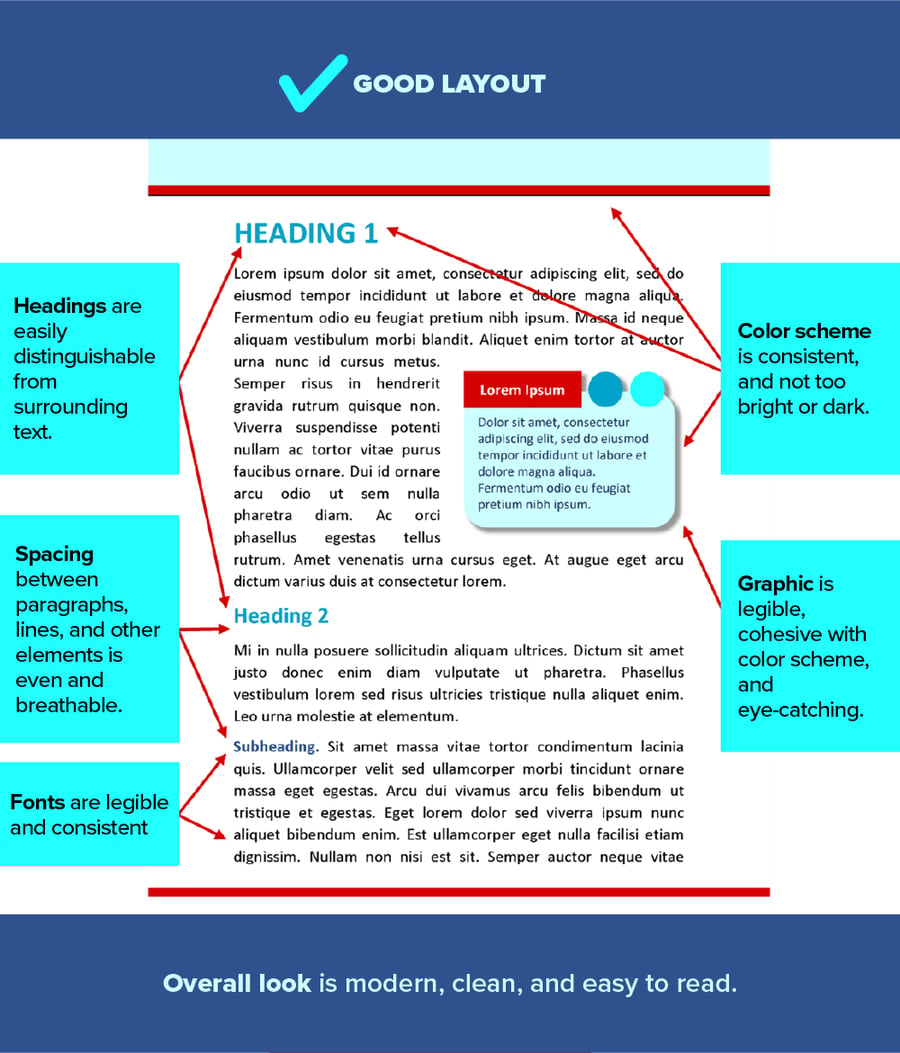
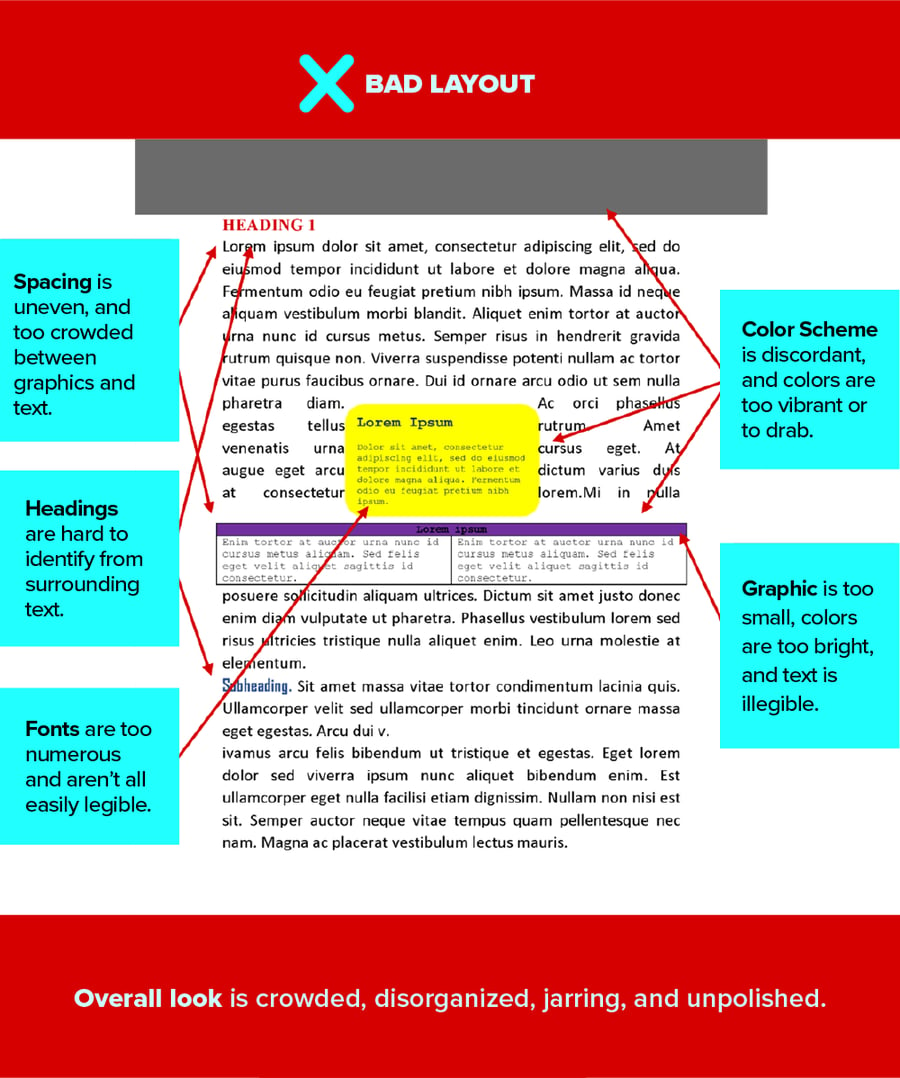
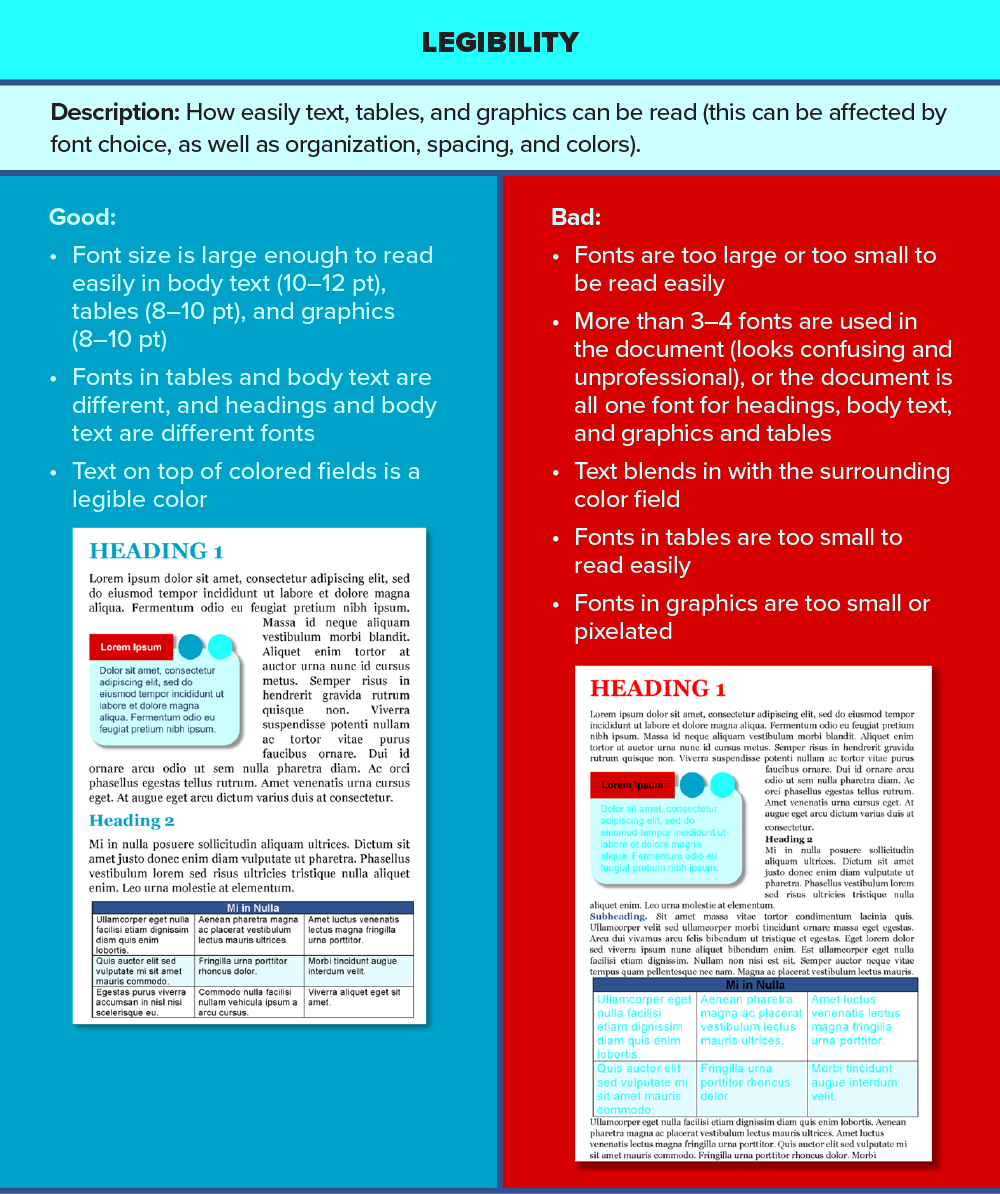
Visual appearance will influence the first impression a reviewer will have of the proposal response, and it can predispose a reviewer to like or dislike a proposal. A well-written proposal can be ruined if it is presented in a layout that is messy, cramped, difficult to read, drab, or old-fashioned. Below is an example of a good layout design, as well as a bad layout design for comparison:
Additionally, desktop publishing is used to format a proposal, so it complies with solicitation (Request for Proposal (RFP)/Request for Quote (RFQ)) requirements. Most often, RFPs will specify requirements for margins, font types, font sizes, and page counts.
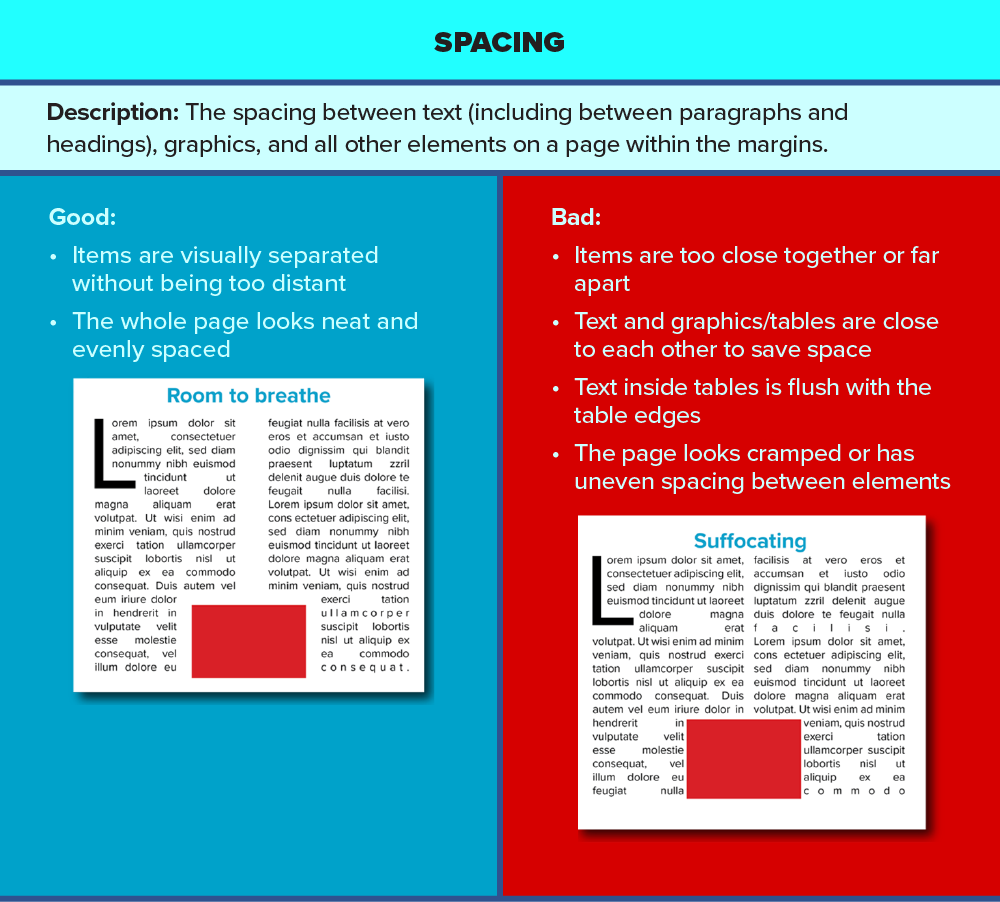
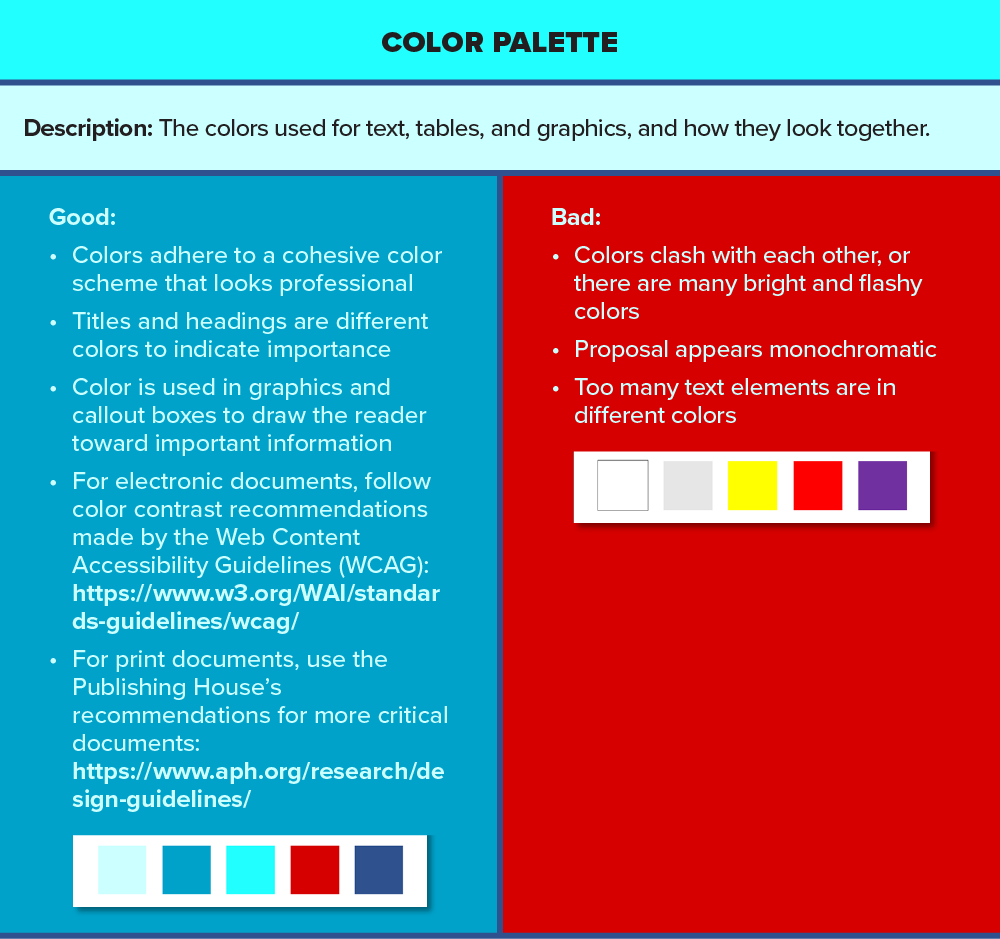
The table below shows some of the visual aspects of a layout that can affect the overall presentation of a proposal:

What software should be used for desktop publishing?
The U.S. Federal proposal industry most often uses Word for desktop publishing and will therefore be the subject of the tutorials in this article. Performing desktop publishing effectively in Word requires a deeper knowledge of the program than average users have. The following tutorials will demonstrate some of Word’s most useful advanced functions.
Using web applications like Google Docs or Word Online for proposal writing and performing desktop publishing is not recommended, as these applications lack the advanced functions needed to format a complex document. In addition, DO NOT edit documents in Word Online after working in the Word Desktop App, as this can corrupt document formatting—it is best to avoid using Word Online entirely if desktop publishing is necessary.
What are the basic desktop publishing skills for all proposal professionals?
1. Complying with RFP requirements
Before demonstrating how to accomplish specific desktop publishing tasks, we will discuss which tasks need to be done for every proposal to comply with solicitation requirements. These tasks should be applied to the template before writing begins in the template. All writers should be made aware of these requirements to refrain from reformatting content which could make the proposal non-compliant.
The following includes the most common formatting settings that a solicitation will specify requirements for:
Font styles and sizes- Complying with specified font styles and sizes is critical—don’t get thrown out for non-compliance over formatting
- Set templates to meet font style and size requirements
- Ensure graphics meet font styles and sizes (during reviews, overlay graphics with a text box to check font size)
Margins and page sizes
- Ensure margins and page sizes comply with formatting requirements by using the correct settings in the template
- For a document with multiple sections that have different page limit requirements (for instance, a technical volume that includes technical, management, and staffing sections that each have different page limits), set up section breaks that will restart page numbering for each section to enable evaluators to track the length of each section.
2. Using page breaks and section breaks
Page breaks are used to separate text on one page from the text on another page. You can insert a page break using the keyboard command CTRL + Enter, or using the “layout” tab.
Section breaks are used when you need to restart page numbering for a new section, change a header or footer, or change the page layout options (such as margins, orientation, size, etc.) of a section without affecting the rest of the document.
At a minimum, a proposal document should have two sections. Material such as cover pages, table of contents, glossaries, and other front matter that is outside of page count and precedes the main section of the proposal should be in a separate section, with separate page numbering, from the rest of the document. Appendices should also be kept in their own section.
3. Setting the page size
The standard page size in North America is letter (8.5” x 11”), while the standard page size internationally is A4 (8.27” x 11.69”). Word will automatically set the default page size to letter or A4, depending on what country you are in. As such, you will most likely only need to adjust a page size if you are creating an outsize page for a large chart or graphic if this is allowed by the page size restrictions described in the solicitation.
Some proposals or proposal sections allow outsize pages for charts or graphics. You can make custom-sized pages by changing the page size settings, but only if the page is in its own, separate section; otherwise, you will change the page size settings of the entire document.
4. Setting the page orientation
Page orientation refers to the direction that pages face; portrait orientation means a page is longest vertically, while landscape means it is longest horizontally.

By default, Word sets a document to portrait orientation. The only time you will need to make pages landscape is for certain large, full-page charts or graphics (such as a large organization chart). Just like changing individual page sizes, however, you will need to make a separate section to make pages a different orientation from the rest of the document.
5. Setting the margins
Margins are the space between the edges of a page and the area in which visual content is placed on a page. Typically, in proposals, margins will be set to 1” on the top, bottom, and left and right of the page; this is also the default setting in Word.
Body text, graphics, and other text and objects that constitute the main content of a document MUST remain inside page margins. However, headers and footers, including page numbers, should be placed OUTSIDE of page margins, which Word does automatically.
6. Creating headers and footers
Headers and footers are content placed above a page’s top margin (header) and below a page’s bottom margin (footer). Information in headers and footers isn’t directly related to the body text on the page, but tells the reader other important information:
- Provides the reader a reminder of where they are in the document (e.g., page numbers and section name/numbers)
- Provides metadata about the document, reminding the reader of high-level information about the document (e.g., the name/title of the document, including the volume name and number, information about the solicitation or submitting company and their logo, information about the organization the proposal is being submitted to, the RFQ number)
- Includes messages of confidentiality or disclaimers that are required on every page, either by RFQ requirements or the submitting company’s needs
If allowed by the formatting requirements of the RFP, headers, and footers should be formatted using a smaller font size (about 2 pts smaller than the body text), a different font than the body text, and even a different color to distinguish it visually from the main content of the document. This prevents headers and footers from distracting the reader from the main content.
Important Note: If you need a header or footer in one section of a document to be different from another, you must disable “link to previous.” You may have to do this if you need to restart page numbering for a new section or an appendix, or if you need to adjust the header and footer to fit an outsize page. Keep in mind that you can only make headers and footers different from other sections, not different from pages in the same section.
7. Inserting page numbers
Page numbers can go in headers or footers, but they tend to be placed in footers. Page numbers, if inserted properly, automatically list the number for each page in the document. You can configure separate sections (for example, a technical approach and a staffing plan) to restart page numbering within a single document—this is useful when proposal sections have page limits, as it makes it easier for both writers and the reviewers to see how long a section is.
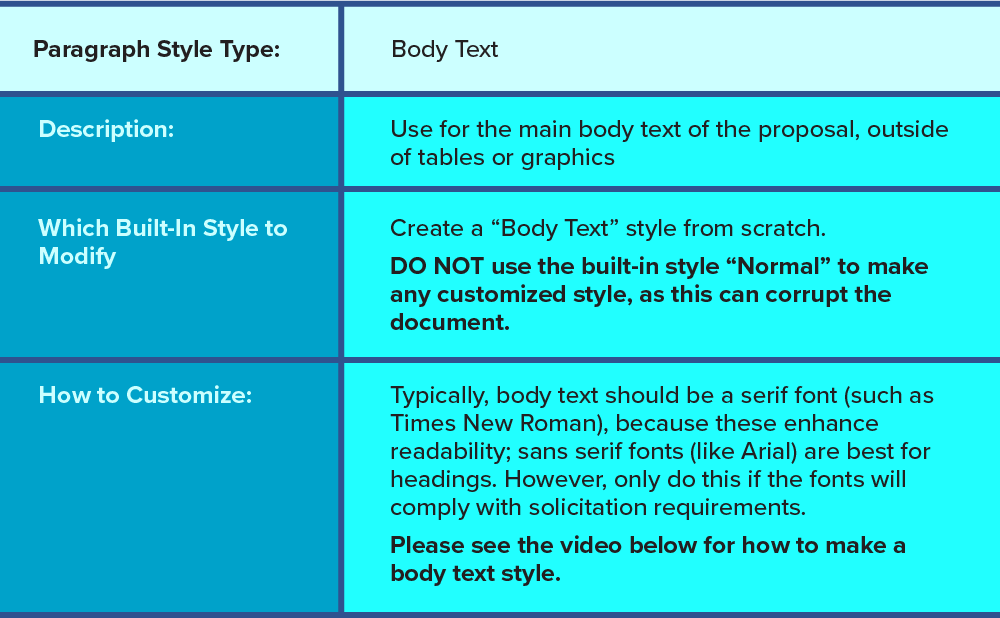
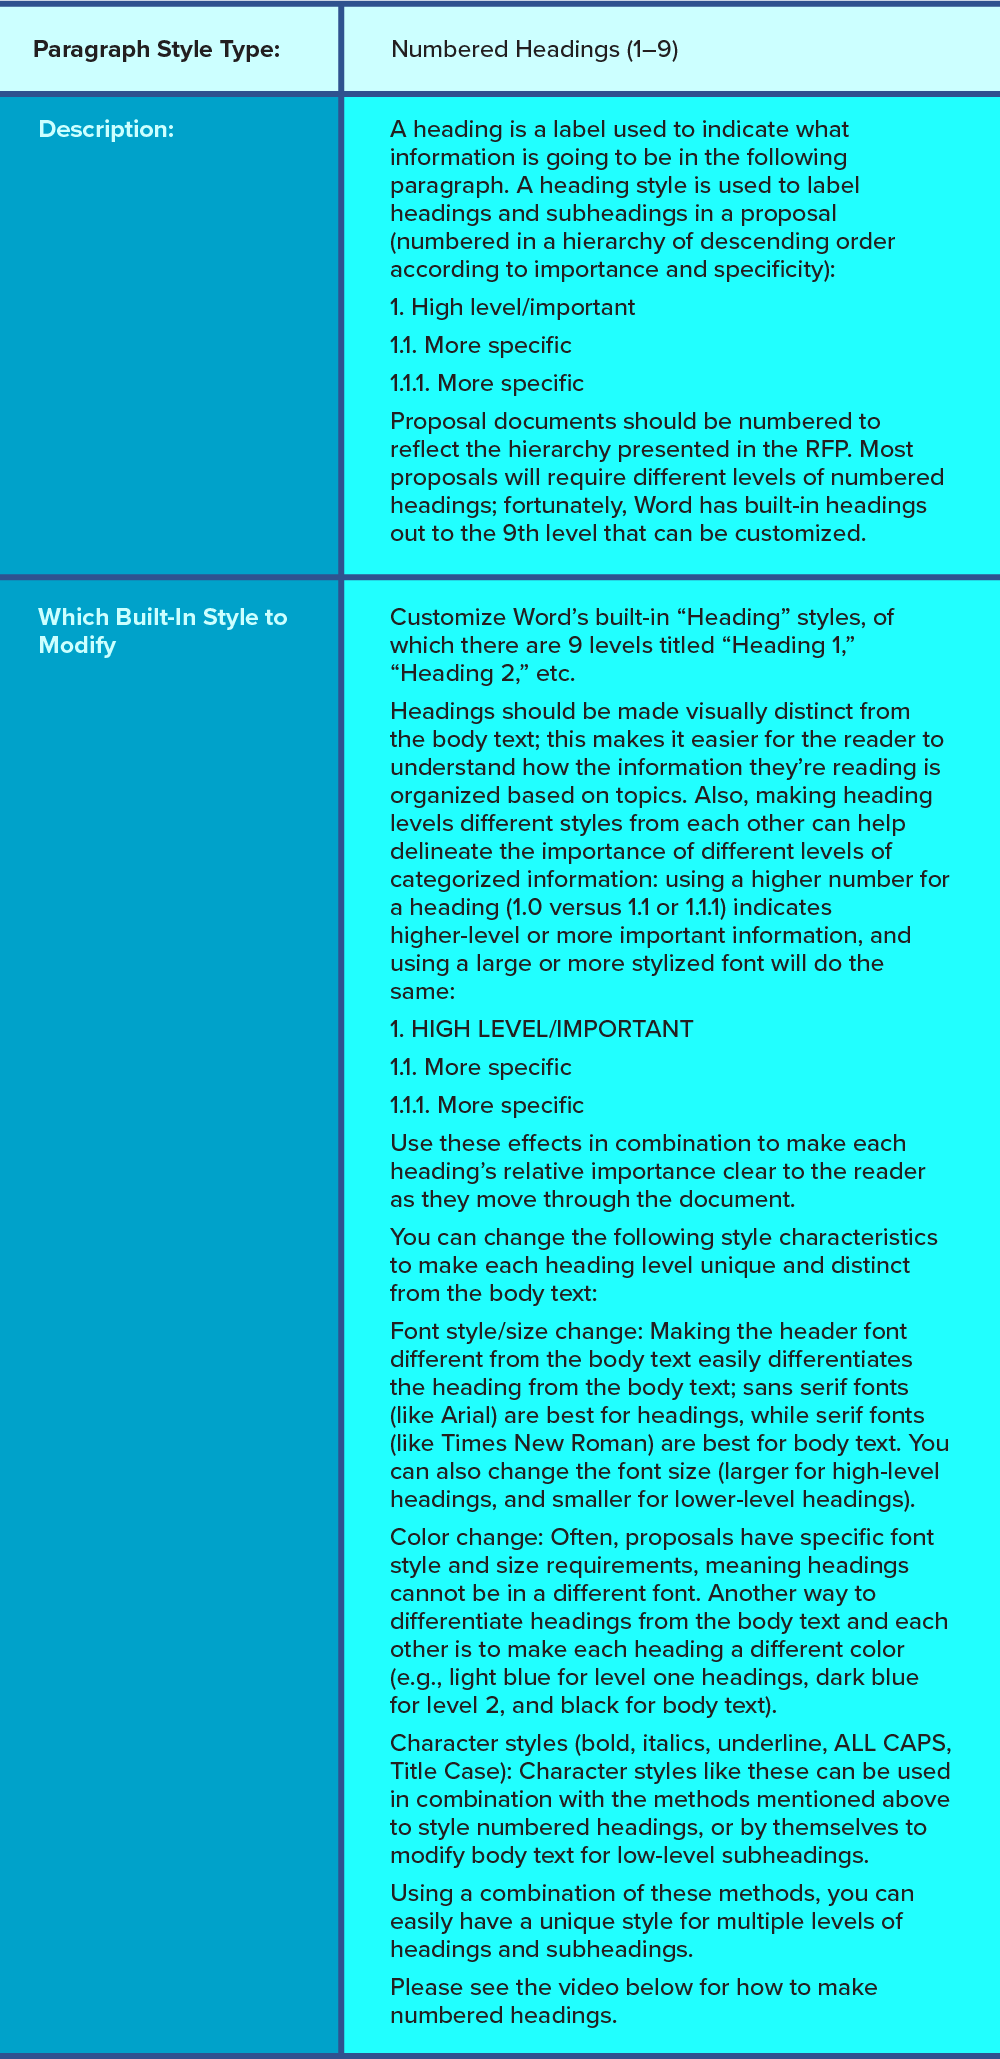
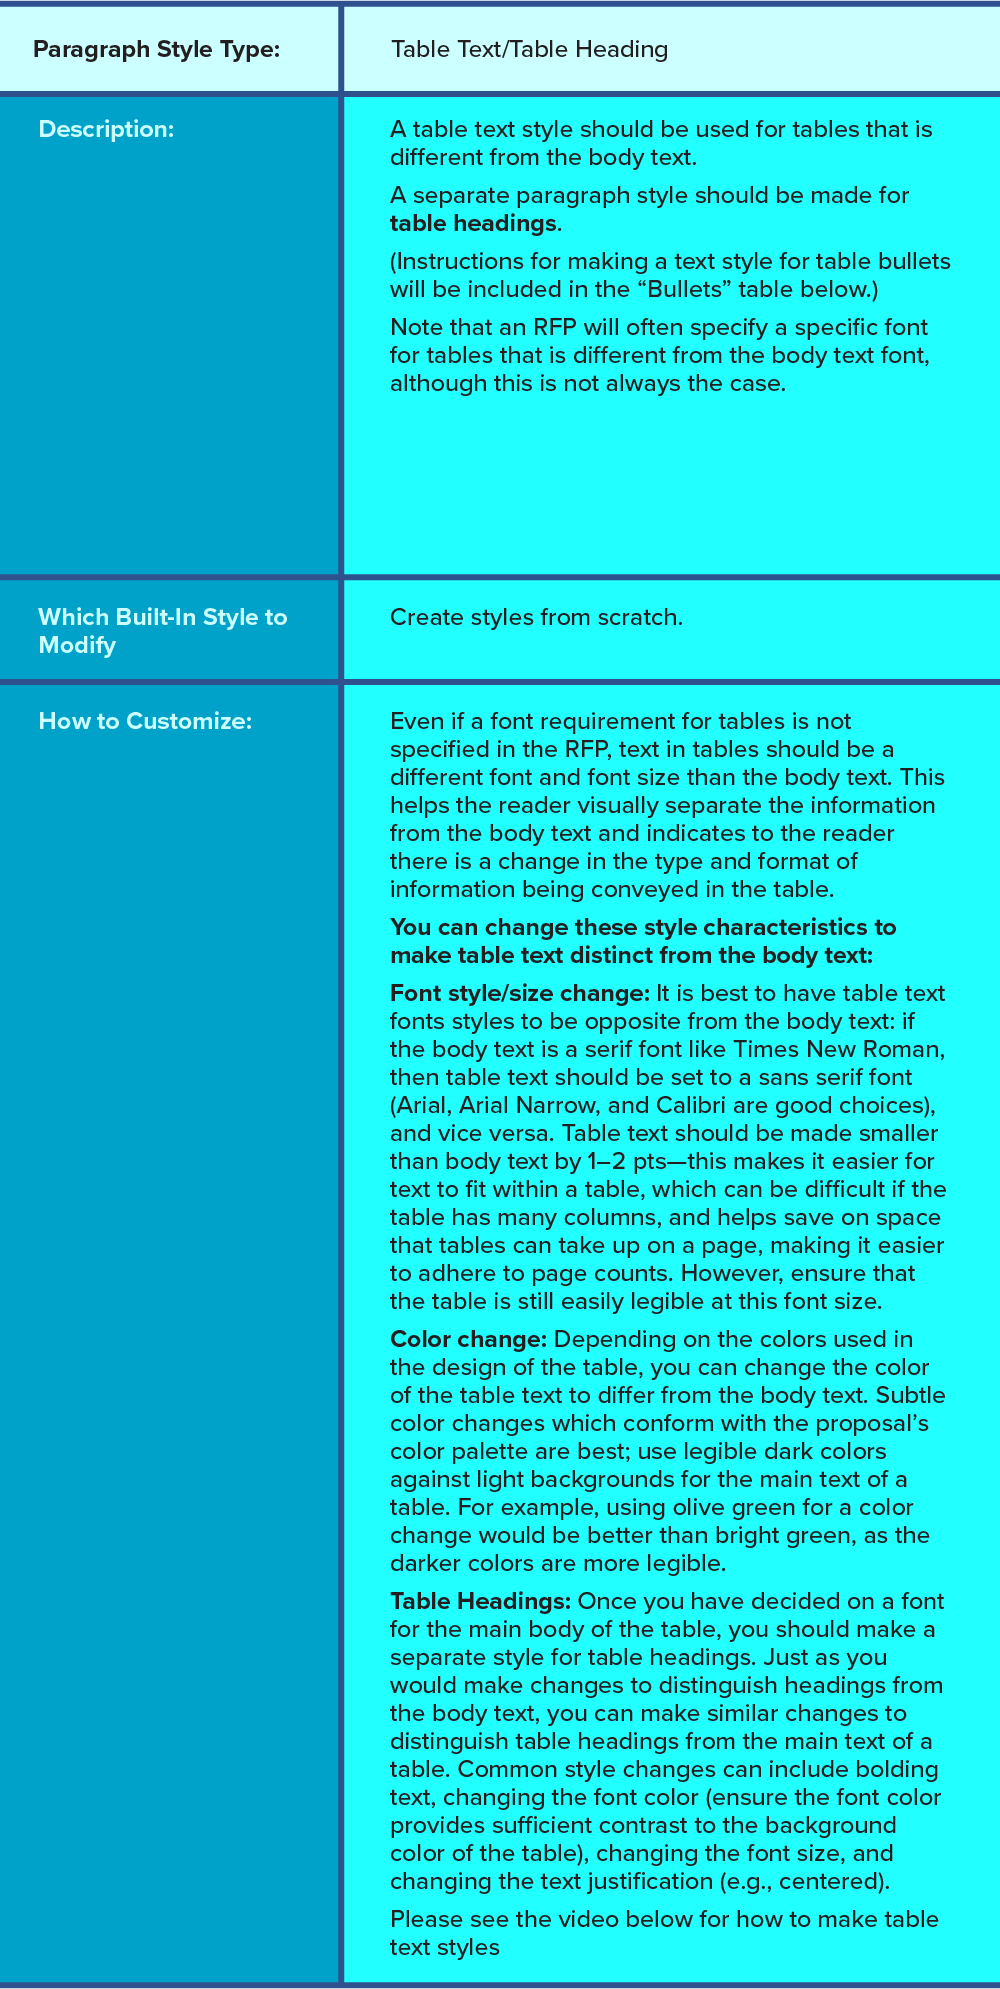
8. Creating, updating, and applying styles
Styles are used to automatically format selected text with the following characteristics: font, font size, color, spacing, indents, and more. It is easy to apply styles; simply click on a line or paragraph, or highlight the text to be formatted, and select the desired style, and Word will automatically apply the characteristics of that style to the selected text.
It is impossible to overstate the importance of knowing how to use styles properly in a document.
In Word, many important automated features rely on using styles, such as:
- Generating tables of contents and lists of tables and figures
- Navigating using Word’s navigation pane
- Making numbered headings
Additionally, if styles are used properly, in less than a minute you can change the font style and size of specific text elements in the document (such as the body text), while leaving headings and other elements alone. This is a great time saver when editing long documents and also improves the document’s consistency through automation.
Fortunately, Word already has built-in styles that can be used as they are, or easily customized for your purposes and your company’s branding. These built-in styles are configured to support the automatic functions discussed above. There are, however, certain styles you will have to make from scratch; this is a fairly easy process.
There are two methods for creating and modifying styles.
- Using existing text that you have formatted with the desired font and paragraph settings.
- Using the “modify style” dialogue box.
For most tasks, either method will produce the same results, and it is up to you which you prefer to use. However, producing certain text effects, like adding a colored border to a header, is easier using the “modify style” dialogue box. These videos show the basics of each method:
The following outlines which styles you need to have a functioning proposal template and provides video tutorials for how to create each.
9. Copying and pasting text and tables
Copying and pasting material incorrectly into a document can cause style settings from another document to be imported into the proposal template, which can break the styles in your proposal document. As such, you always need to copy and paste text and tables without formatting. If enough problems are caused by imported styles and settings, you may be forced to move the proposal to a new, clean template, which is exceedingly time-consuming. So, ultimately, copying and pasting material correctly saves time that would be otherwise wasted fixing errors.
a. Copying and pasting textWhen pasting in text from another document, right-click and select the “keep text only” option. This ensures text adopts styles in the new document and does not import styles from the old document. Pasting text this way will remove formatting like bolding, italics, and underlining from the original material; be sure to reformat the text in the new document if you want to preserve this formatting.
b. Copying and pasting tables
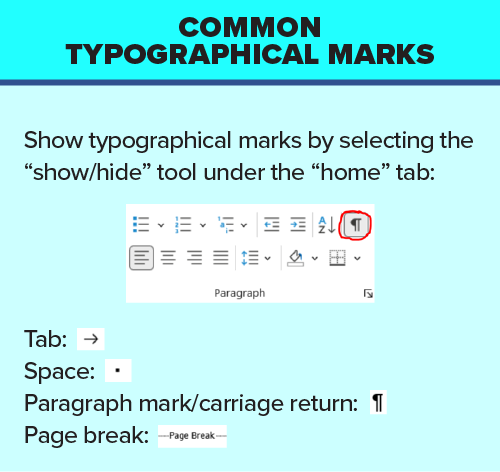
When pasting in tables from another document, you must also use the “keep text only” option. However, this will paste the text-only and remove the table structure. You can reconstruct the table by using the “convert text to table” tool, found in the “insert” tab under “tables”. This feature will create a table using a specified number of columns and will separate text into different cells based on typographical marks (typographical marks are typically hidden but can be viewed using the “show/hide” tool under the “home” tab).
If this tool does not recreate the table properly, you may have to reconstruct the table manually.
10. Inserting graphics
It is best to insert graphics from a file, instead of copying and pasting them in from another source, as this preserves the size and resolution of the original graphic. Graphics artists should be instructed to create graphics using specific dimensions, so they do not have to be resized when inserted into a document. Graphics should not be resized for two reasons:
- The graphic’s resolution may be distorted, making the graphic blurry or difficult to read; low-resolution graphics also make a layout look unprofessional.
- The font size may be changed and become non-compliant.
According to the needs of the proposal section, graphics should be created to fit a specific size (such as a quarter page or half page) or to fit a certain size margin (for a typical document with 1” margins all around on letter-size paper, the widest a graphic can be is 6.5”), and with a minimum font size (if one is dictated by RFP requirements).
After being inserted into the document, you can change the layout options for a graphic to format how body text wraps around it. For graphics that span the full width of a page, use the “in-line with text” layout option. For smaller graphics, use the “square” or “tight” layout option with text wrapping, so that the main text of the document surrounds the graphic.
Keep in mind that graphics and tables, like body text, must remain within page margins to be compliant.
11. Inserting figure/table captions and cross-references
Figure/table captions, as described earlier, identify figures/tables using a number. In proposals, these should include an action caption and a description of the meaning or significance of the graphic.
Cross-references are references in body text to a figure/table, heading, or other section in a document that directs the reader elsewhere in the text to supplementary material. Most editing style guides recommend that figures/tables be referred to at least once in the body text.
Word has a tool in the “references” tab that enables users to insert numbered captions for figures and tables automatically and add cross-references to figures in the body text. Using this feature enables the automatic generation of a list of figures and/or a list of tables (see “Insert table of contents, list of figures, and list of tables” for how to insert lists of figures and tables). While it is possible to automatically generate lists of figures and tables without using this feature, this is the simplest method. In addition, using this tool automatically updates figure/table numbers throughout a document as additional figures and captions are added, and makes it easy to update cross-references that were placed in the body text (a cross-reference number can be updated by right-clicking on it).
12. Inserting a table of contents, list of figures, and list of tables
These tables/lists are often required by RFPs and are typically considered outside of page count. They should be placed after the cover page and before the main section of a document.
Tables of contents and lists of figures tables can be generated automatically if built-in paragraph styles are used, or were customized, for a template. In Word, any text formatted using one of the built-in heading styles can be included in a table of contents. You can specify the number of heading levels that will be included in the table of contents; by default, Word shows three (using a typical numbered heading approach, this would show 1.0, 1.1, and 1.1.1). For lists of tables and figures, any text formatted with the Caption style will show up in the list.
- Keeping figure and table titles while removing captions from lists of figures and tables:
Some proposal teams prefer to keep only the figure/table titles in lists of figures and tables and avoid including the entire caption. In order to do this, the text of the caption must be made a different style than the title—however, you must use a special tool called the Style Separator to use two different styles in one paragraph. This tool is not accessible via the default tabs and toolbars in Microsoft Word, but it is easy to add. Alternatively, you can use the keyboard shortcut Ctrl + Alt + Enter to add in a style separator.
The following video will demonstrate how to add the style separator to an accessible toolbar, and how to use the style separator to remove captions from lists of figures and tables.
Conclusion
These simple tools allow anyone to build a simple, useable proposal template with all the elements needed to make a professional-looking, compliant proposal and enable proposal writers to easily use and navigate a premade template without breaking the formatting. While it’s best to have a desktop publishing expert on-hand to create and fix document templates, you now have enough expertise in Word to perform typical layout tasks.
For additional training, please use the template that was built using the video tutorials. This can be used to check the settings used in the tutorial and for additional practice. Or you can customize it and use it for your proposals.